
A designer asked to run the UI locally and edit it while watching the screen. Common enough request, but not simple on the platform I work on.
The api lives on an internal network only. Caddy doesn’t proxy it, so there is no URL to call it from outside, and db and redis don’t publish ports at all. Meanwhile admin (Next.js) is a BFF, so its server components call the api at render time. Boot admin alone on a laptop and every one of those fetches fails, so the page comes back as a 500. Even someone touching nothing but frontend code needs a live api connection.
The only way to reach it is an SSH tunnel, and handing out SSH access also hands out docker compose down. The real question became how do you grant the tunnel and nothing else?
I issued a key whose authorized_keys options block the shell and leave only port forwarding, and pinned the tunnel to a single destination port.
1. What this platform looks like
The whole stack runs on one server under docker compose.
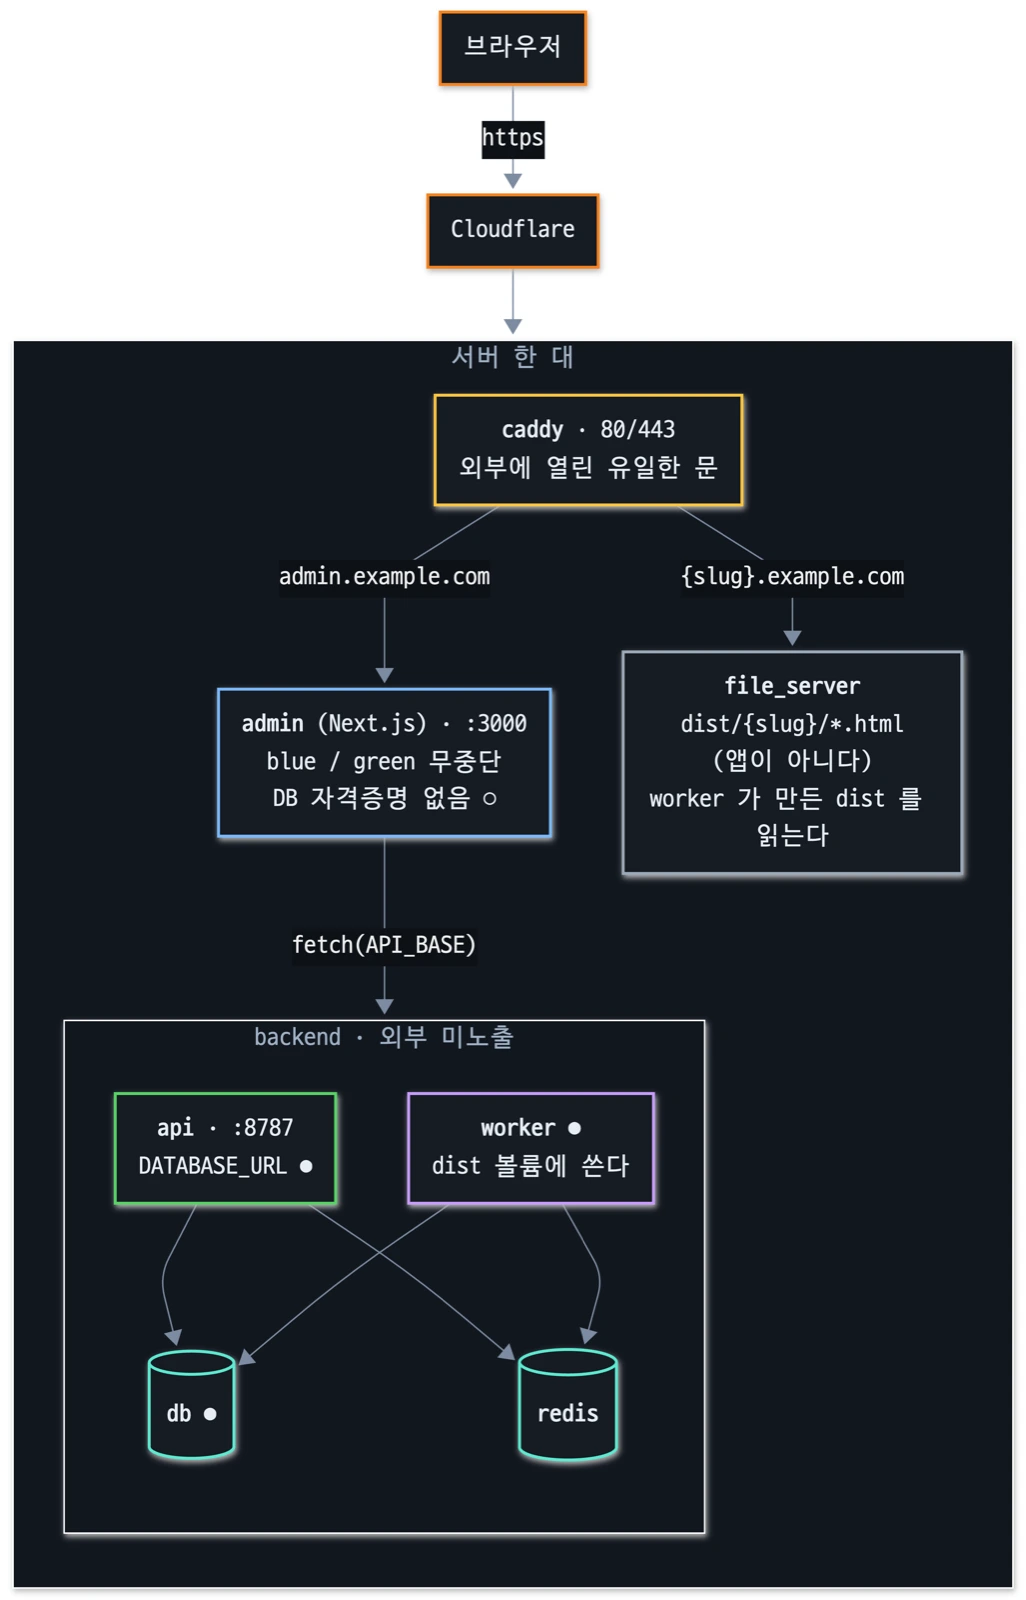
                            browser                               │ https                               ▼                     ┌───────────────────┐                     │   Cloudflare      │                     └─────────┬─────────┘ ══════════════════════════════│═══════════ one server ═══════════                               ▼                     ┌───────────────────┐                     │  caddy   80/443   │  ◀── the only door to the internet                     └───┬───────────┬───┘          admin.example.com          │ {slug}.example.com                         ▼           ▼           ┌───────────────────┐   ┌───────────────────┐           │ admin (Next.js)   │   │ file_server       │           │ :3000  blue⇄green │   │ dist/{slug}/*.html│           │ no DB credentials │   │ (not an app)      │           └─────────┬─────────┘   └─────────▲─────────┘                     │ fetch(API_BASE)       │ read ─ ─ ─ ─ ─ ─ ─ ─ ─ ─ │ ─ ─ ─ backend (not exposed) ─ ─ ─ ─ ─ ─ ─                     ▼                       │           ┌───────────────────┐             │           │ api  :8787        │             │           │ ● DATABASE_URL    │             │           └────┬─────────┬────┘             │                ▼         ▼                  │ dist volume        ┌────────────┐ ┌────────────┐        │        │ db  ●      │ │ redis      │        │        └─────▲──────┘ └─────▲──────┘        │           ┌──┴──────────────┴──┐            │           │ worker  ●          ├────────────┘           └────────────────────┘
           ● = holds DB credentials.  admin does not.
There are two networks. web is where caddy sits and things get exposed; backend is where db and redis live. Those two publish no ports, so knowing the password buys you nothing — there is no address to dial.
The api is the same story. Caddy doesn’t proxy it, so no URL to it exists on the internet. The compose file says so out loud.
# API: internal only (backend). caddy does not proxy it — admin calls it via API_BASEThree principles
| Principle | How it shows up |
|---|---|
| Keep exactly one door to defend | Only caddy’s 80/443 is exposed |
| Keep strong credentials on the inside | The token is read from a file in the container |
| The UI layer does not own the data | admin has no DATABASE_URL |
The third one is why admin is a BFF. If the UI server holds no DB credentials, then breaking into that layer yields no DB connection info, because none exists there. As a bonus, “is the DB password set correctly on admin?” was never a question to begin with. It’s absent from the env list from day one.
There’s a cost: one more network hop for every page. I judged it worth paying.
What the BFF actually does
The naming invites confusion, so: the BFF is admin, not the api. Backend For Frontend — from the browser’s point of view admin is a backend (there is a Next.js server running), and that backend exists for exactly one UI. The api is the real backend the BFF calls, the owner of the data.
browser ──▶ admin (server code) ──▶ api ──▶ db cookie │ token ◀── HTML ───────┘ ◀── JSON ── ← the shape changes hereThe boundary lives in one file. The first line of admin/app/_lib/api.ts declares it.
// BFF proxy. Never expose the token to the browser....const API_BASE = process.env.API_BASE ?? 'http://api:8787';Two things happen there.
First, it turns JSON into a page. The api’s JSON does not flow through to the browser. A server component waits for the api response before rendering, then ships finished HTML. The browser never sees the JSON. About 39 pages under admin/app follow this same pattern.
Second, it swaps credentials. If the browser sent a session cookie, that cookie is passed through to the api as the user’s identity. If there isn’t one, a service token is attached instead, read from a file inside the container. The browser doesn’t know that token exists.
The dividing line is 'use client'. The absence of that line in a page.tsx is what marks it as server-side, which is why it can dial an internal address like api:8787.
┌─ page.tsx (server) ──────────┐ │ call api → JSON → return UI │ admin container │ <CategoryChat initial={…}/>│ └──────────┬───────────────────┘ │ hands data down as props ▼ ┌─ 'use client' ───────────────┐ │ useState · onClick · interact│ browser └──────────────────────────────┘2. The request collided with that design
What the designer wanted was simple: serve the UI on local :3000, look at real production data, and touch only frontend code.
Why editing the UI needs a server
Most screens render on the server, and rendering calls the api. If the api is unreachable, no HTML gets produced at all. You can rewrite the frontend all day and still get a 500 where the page should be. That’s the answer to “why does someone editing only the frontend need the backend?”
I considered running the whole stack locally instead. There is effectively no seed data, so lists, stats and cards all come up empty.
That left exactly one option: an SSH port forward, so the local UI server can see the production api.
The problem is what comes attached. Opening a tunnel requires SSH access, and SSH access lets you do anything on the box. One docker compose down takes the service offline. I needed to hand over the pipe without the keys.
I wrote down the criteria before building anything
Instead of jumping to an implementation, I listed the conditions first. Every later decision came down to whether it passed this table.
| Criterion | Why |
|---|---|
| Cannot operate the server | Neither by accident nor on purpose |
| My own laptop must not be in the path | Anything that needs me online is a failed design |
| The tunnel must have one destination | It must not leak into other internal ports |
| Revocation must be one line | If it’s hard, nobody ever revokes |
That table sorted the candidates quickly.
- Share my own SSH key — fails the first row. Shell,
sudoand docker all ride along. - Run the tunnel on my laptop and relay — fails the second row. Their work stops whenever my machine sleeps.
What survived was issuing a separate key for the designer, one that can only tunnel.
3. Isolation: block the shell, keep the tunnel
First, authentication and authorization are different layers
“Opening a tunnel” sounds like anyone could dial in. There’s a gate before that.
someone knocks on port 22 │ ├─ no registered private key → Permission denied (publickey) ← outsiders stop here │ └─ has the designer's key → authenticated └─ that key's options apply → one tunnel, nothing elseThis server takes public keys only.
pubkeyauthentication yespasswordauthentication nokbdinteractiveauthentication noPort 22 is open to the internet and bots knock on it constantly, but no amount of password guessing has a path through. Key auth works by having the client sign a challenge with the private key while the server verifies with the public one, which means the private key itself never travels the wire. Capture every packet and there is nothing to steal.
So the layers split like this.
| Layer | Question | What it stops |
|---|---|---|
| Authentication | Who are you? | Outsiders, all of them |
| Authorization | What may you do? | Shell, commands, other ports |
The restrict and permitopen options in this section are not what keeps outsiders out. Outsiders are already stopped at authentication. These options exist to narrow what the authenticated designer is able to do.
The command path and the port path are separate
This is where the design turned. Two things run independently inside a single SSH connection.
one SSH connection ├── session channel → shell, command execution └── direct-tcpip channel → port forwarding (-L)Port forwarding is not something you do by logging in. It’s a separate channel, so you can block the shell completely and the tunnel still works. That single fact is what makes “the pipe without the keys” possible.
The implementation isn’t a new account. It’s per-key restrictions in authorized_keys. Same login, different permissions depending on which key authenticated.
┌─ ~/.ssh/authorized_keys ──────────────────────────────────┐│ ││ ssh-ed25519 AAAA... me@laptop ← no options ││ ↑ unrestricted. shell and sudo included ││ ││ restrict,port-forwarding,permitopen="127.0.0.1:8987", ││ command="/bin/false" ssh-ed25519 AAAA... designer ││ ↑ sshd enforces these whenever this key authenticates ││ │└────────────────────────────────────────────────────────────┘Each piece does one job.
| Option | What it does |
|---|---|
restrict | Turns everything off — pty, X11, agent forwarding, port forwarding, user-rc |
port-forwarding | Turns just forwarding back on |
permitopen | Pins tunnel destinations to this one address |
command="..." | Whatever arrives on the session channel, only this runs |
Nothing gets opened and then blocked — a different program simply runs instead. And ssh -N, which is what a tunnel uses, declares that no session channel will be opened at all, so even the forced command never fires. Only the forwarding channel remains.
I opened a port in order to pin the destination
My first implementation still had a hole: I couldn’t apply permitopen.
The api container lives on a docker network, so even the server host couldn’t reach it at 127.0.0.1:<port>. You need the container’s IP.
ssh -L 8787:172.20.0.5:8787 server# ^^^^^^^^^^ changes on every deployI went as far as writing a script that looked the IP up before starting the tunnel. The problem is that a destination that keeps changing can’t be pinned. That’s the third row of the criteria table unmet, which in practice means that key could also tunnel to other internal ports, db on 5432 included.
So I flipped it. Instead of chasing the container, I created one address on the host that never moves.
ports: ["127.0.0.1:8987:8787"]# └ connections to this host address → forwarded to 8787 in the containerThat one line does three things.
- A listener appears on the host. From inside the server, the api is now reachable at
127.0.0.1:8987. - The internet still can’t see it.
127.0.0.1belongs to the machine itself and never binds to an external interface. - The address stops moving. Redeploy the container all you like; the host side stays
127.0.0.1:8987.
The tunnel command settles down with it.
ssh -L 8787:127.0.0.1:8987 server# ^^^^^^^^^^^^^^ always the sameOne thing trips people up here: the destination in -L is resolved by the server. That 127.0.0.1 is not my laptop, it’s the server itself. Which is also how permitopen="127.0.0.1:8987" reads — this key may connect to the server’s port 8987 and nothing else.
With the destination pinned I could finally apply permitopen, and the IP lookup script disappeared entirely.
  designer's laptop                        server┌──────────────────────┐               ┌──────────────────────────┐│ admin (next dev)     │   SSH tunnel  │  127.0.0.1:8987 ─▶ api   ││ :3000 ─▶ 127.0.0.1:8787 ═══════════▶ │      (loopback only)     │└──────────────────────┘               └──────────────────────────┘
  what this key can do  : this one port  what it cannot do     : shell ✗   run commands ✗   db(5432) or any other port ✗
This is the part where opening a port makes things safer. That’s backwards from intuition, so here’s the reasoning.
| Who | Without the port | With loopback published |
|---|---|---|
| The internet | No reach | No reach |
| Anyone with a shell | Reaches via container | Reaches via loopback |
| A forwarding-only key | Reaches via container | Reaches via loopback |
Nobody new gains reach. Only the route changes. What you gain is a fixed destination, which is what makes the restriction expressible, so the net effect is strictly narrower.
WARNING
Drop the 127.0.0.1 prefix and you get the opposite. It binds to 0.0.0.0 and goes straight to the internet, and worse, Docker’s port publishing bypasses firewalls like ufw. It’s the perfect setup for believing you’re protected when you aren’t.
4. Don’t make people remember the procedure
Even with all that, a sequence remains. Check the tunnel is alive, check nothing already holds port 3000, then start the dev server. Leave that to memory and it eventually gets skipped.
The designer works through a coding agent more comfortably than a terminal, so I pinned the procedure into a /local slash command in the repo. I also wrote a rule at the top of the agent instructions file so that a plain request like “open it locally” runs the same steps. The result has to be identical whether or not you know the slash command exists.
Running pnpm dev off the cuff breaks in two places.
- If the tunnel is down, every page is a 500. It looks like a UI bug, so you go dig in the wrong place.
- If a dev server is already up, Next slides to 3001. You keep staring at 3000 wondering why nothing changes.
So the order is baked into the command: check port 3000 → check tunnel status (re-register if dead) → start the dev server in the background → curl the response before reporting the URLs. That last step matters most; it stops the agent from saying “it’s up” without checking.
The don’ts are in there too. next build shares .next/ with the dev server and breaks the running one, and editing config values because a page won’t load just buries the real cause. Running docker compose against the server is on the list as well. Writing the rules into the procedure file instead of telling a person means they apply when I’m not around.
Scoring against the criteria
Back to the table from section 2.
| Criterion | Result |
|---|---|
| Cannot operate the server | ✅ Shell and command execution both blocked (verified) |
| My own laptop must not be in the path | ✅ The designer connects with their own key |
| The tunnel must have one destination | ✅ Pinned with permitopen |
| Revocation must be one line | ✅ Delete one line from authorized_keys |
All four hold. That doesn’t make it the only answer.
The cleaner option is a separate preview environment. Push a branch, share one URL, and nothing needs installing on anyone’s laptop. I didn’t pick it for a simple reason: what was needed here is editing code and seeing the result immediately, and a preview environment makes you wait for a build every time. When the nature of the work changes, that’s when to move.
Looking back, the highest-value thing I did was writing the criteria down first. Abandoning the first implementation, the one that chased container addresses, came directly out of the third row. Without that table I’d have shrugged at “well, the tunnel works” and shipped it.